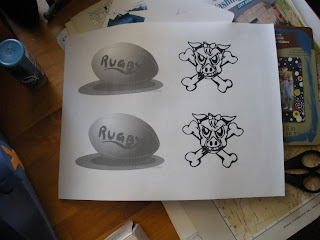
My best friend of 20 years has been playing rugby since her freshman year of college. She still plays today with the local metropolitan Division II team which recently made their first trip to Nationals. I was so excited about the opportunity that she earned with all her hard work, that I kept almost up to the minute tabs on the tournament - or as much as I could. What she failed to mention in all of our numerous conversations leading up to the tournament was that she had become team captain. I found this out by reading a rugby magazine's article focusing on her team's trip to the tournament.
So needless to say, seeing that her birthday was just about two weeks after the tournament I was looking to link her love of rugby and some creative projects together. I settled on doing chalkboard coasters with a rugby design. Admittedly she is not the first to receive this gift but her's was a great deal more perfected than my first attempt.
Here's what I did and yes, you may take it, tweak it and make it work with your supplies.
My supply list included:
Acrylic paint in however many colors you need
Three plastic containers for mixing paint and grout
An exacto knife/craft nife
Scotch or 3m (or whomever you choose) felt adhesive
Sticker maker - this is key if you are doing a design like I did
A specific design - I took the outline of a rugby ball and then the logo for my friend's team (they are the lady pigs). Yes, there is a reason there are two of everything. In fact, there ended up being three.
As many 4x4inch ceramic tiles as there are coasters. I bought a box at Lowe's or Home Depot for about 44 cents each. This project is one of my favorites because it tends to be low cost and easy to do.
I used my sticker machine, Xyron 5" inch with removable adhesive. I used permanent adhesive the first time I made these style of coasters and it cause some heavy clean up which I will address later. This time, I tried the removable adhesive and it went a great deal easier. Furthermore, if you do not have a sticker machine do not, I repeat DO NOT, go out and buy one just for this project. You can tape down the designs and you will just need to take care to go around the edges.
Finally, you will need non-sanded or unsanded grout. I also picked this up at Home Depot or Lowe's. The sticker price is a little high - $4.35 or something - but worth it if you plan to make a lot of chalkboard paint. Which, if you are looking at pinterest right now for chalkboard anything, you can see there can be a lot of crafty projects involving it.
Anyway, essentially pick your design, your colors and pick up your supplies at your local craft store. Lay out your supplies on an even surface where you have some room to work. When I first started crafting, this was usually my parent's dining room or coffee table. Now, I have a craft desk and sewing desk but that's because my fiance and I have the space for it. Use what you have. :)
Cut out one of your nifty designs using the craft knife. I highly recommend putting something underneath your paper so you don't scratch you work surface. Unless you are looking to age your work space sooner, then go for it. The craft knife allows you to cut precise lines and give a nice clean edge. No craft knife in your supplies? Use scissors! Your decal/design could turn out like mine:
I then placed it through the sticker making machine. Again, if you do not have one you can just tape the design.
I love this sticker machine because I can turn any paper product into a sticker, like the rugby ball above.
From here, I simply repeated the process with the other paper pieces. The key here is to also run the outlines of the decals through the sticker machine. You will see why below.
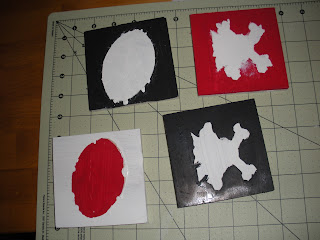
Carefully place your stickers on your coasters. Mine are generally as close to the center as possible. This picture above is to simply show you the process that you will have to go through for both the design and the outside of the coasters. I placed these down and then went to work on mixing paint. To give credit when needed, I borrowed my recipe for chalkboard paint from Salt Tree. Of course, I did not need to make a cup of paint at that moment, so I scaled back my amounts to about 4oz of paint and 1.5 teaspoons of grout. I mixed them using good old popsicle sticks in my clear containers.
Slight warning: this paint can smell because of the grout. If you have candles or the ability to open windows, I recommend using them. From there, just paint your desired area.
Since all of the paper areas were removable stickers, I just went ahead and painted over them. I would be peeling them off later.
I repeated the process of mixing the chalkboard paint and the painting process for each tile until I got to the stage above. From here, I simply let the paint dry for about ten minutes and the removed the sticker'ed area.
If like me, you ended up with a residue, have no fear! Simply use the handy solvent you have your in your bathroom to remove other paint. By this I mean, dig out your nail polish remover (that includes acetone) and some cotton swabs or balls. Soak the swabs in the acetone and then rub it on the adhesive to remove. This also works well on areas that you might have smudged or messed up on.Once you've removed your adhesive, you can move on. Since I wanted to expedite the drying time and finish the coasters in about a day, I put the coasters in the oven at 250 for fifteen minutes. I removed them carefully from the oven and let cool on wired racks for about 20 minutes or until they were cool enough to handle. I began the painting process over again but simply finished painting the opposite area from the first time. If you have the sticker machine, you can do a second round of stickers or you can simply paint very carefully. My recommendation, if you have a steady hand just go for it. If not, then do the sticker method.
Again, use the acetone if you want to remove some of the adhesive. As a final step in the paint process, I filled in some of the finer details. You can tell, painting pigs is not my strong suit. In fact, I took advantage of the fact that my fiance took art in high school for the second pig and had him paint it.
Finally, I used the scotch or 3m felt adhesives and attached four to the bottom of each coaster - for a total of 16. OH! You will need to find a piece of chalk somewhere and attach it to this gift. Sort of defeats the whole purpose if you don't attach it, doesn't it? Box it up nice and pretty (they sell plain 4x4 inch craft boxes at your local craft store) or put it in a bag.
Some side notes: I ended up with a lot more chalkboard paint than what I needed for this project which is why I used the plastic containers with lids. I sealed them up, labeled them and now I have paint for the next time I do chalkboard coasters. Which as, you can see, are really cool and a repeat gift. My friend loved them and couldn't stop admiring them at her birthday lunch the other day. She loved that even my fiance got in on the painting and squealed (like a little piggy) in excitement. Her mom has a picture of her reaction but I have yet to acquire it. When I do, I will edit this post and add it in.
Hope your holidays are keeping you busy, jolly and appreciating the relationships you do have. All this gift making certainly makes me appreciate the time I spend with my friends and family. :)


No comments:
Post a Comment