Wednesday, July 31, 2013

Painting update

,So at this point, I called in my paint expert to see my classroom. Who is my paint expert? My best friend and maid of honor, Liz. You may recall her help on the wedding invitation assembly.

She drove up to my school today to help paint the tip tips of the room and offer some advice regarding my native decals.

Me: so what do you think? We would need primer if we were going to paint over them...
Liz: Well..... We could pull the trick you did at your wedding?
Me: What trick?
Liz: Covering them up with fabric of course! Then you could make them into poster areas or bulletin boards or something.

Liz has the best ideas sometimes, I swear. She remembered my curtain assembly I did to cover up some paintings in the reception hall at my wedding. See, our vendor wouldn't allow us to take the paintings off the walls, nor tape or hang with nails things over them. Instead, I sewed curtains to cover them up and we rested the curtain rods/crown molding from then home repair store and placed those over the paintings. When I get my wedding pictures back, I will post one of what I mean.

Anyway, Liz and I set off to the craft store where we found some great patterned fabric, white fabric and batting on sale. We purchased enough to cover three of my four native decals and went back to school. We realized upon our return we lacked things like: measuring tape, scissors, staple gun, etc. So covering up my new frenemies will have to wait another day.

Instead, we went back in and did some touch up painting, more trim and getting into the hard to reach places. I have to say, it's shaping up quite nicely.


Tomorrow I should finish the wall with the fish on it. Then next week I will take on the wall with the windows (where i stood to take pictures) and then finally the fabric. Oh and finish resurfacing the main desk I plan on using.

So does my room look like a disaster zone or something from HGTV gone amuck? 

~*~ Delayed post due to technological difficulties 

Wednesday, July 10, 2013

DIY Canvas classroom sign

I saw several weeks ago one Etsy one of those great subway signs that puts a spin on the "family rules" sign. It laid out the rules for a classroom. Being creative and knowing how I like to make it my own if I can, I made a plan. Rather than pay the $40 something dollars for one of the premade signs, I went out and made my own.

I copied down some of the basic text, tweaked a few to suit my secondary students and put them into a word document. Then, I simply changed the text around to a few that I liked and made sure the text filled the page. Oh, make sure your text is bold before you print. You will see why later.

At the craft store, I found one of the canvas sizes I liked and waited for it to be on sale and/or a coupon to emerge. If you watch the papers or check your email, this wasn't a long wait. :) For my choice, I bought an 18x24 inch. If you notice, printer paper is 8.5x11 which fits almost perfectly inside the back part of the canvas frame. 

Again, I tweak and try to make things better. Thus I adapted my idea from the Love Map I made for Mr. Husband back in November and put the papers behind the canvas. Rather than try and tape the paper behind the canvas again, I tried something different. 

I used a stapler! Shocking, I know. 

Place the paper on the backside of your canvas with the text facing towards the canvas. Staple the paper to the canvas so the legs are sticking out the other side. Then simply place your canvas in front of a light or in front of a set of glass doors. If doing the latter, preferably do it on a sunny day so the light shines behind and illuminates your text. *note, if you did not bold your text, it will be hard to see the text through the canvas.

Once the paper was attached, I got out my Painters' Pens from the Love Map project and went to work.

About two thirds of the way through, you can see I switched pens. My red paint pen was running low and needed to recharge after writing up right for so long. By doing the different fonts, I got some variance. 

My plan now is to add a border or doodles around the edges in order to make the piece brighter. Also when my red pen has recharged, I will fill in some more of the bubble style letters.

What pieces do you hang in your class to make it your own? Or do you let students direct the pieces in the classroom?

Classroom painting and debates

My creative nature doesn't just exist within the confines of my home. It extends to my classroom now too. The admin team at my school gave the okay to paint my classroom for several reasons

1) I am a new teacher, so my room should be my own 
2) Others in my department have their rooms painted so there should be some continuity
3) I teach US History, not state history so some of the items on my walls don't exactly make some sense..


There are several of these around the room...

So it's been a debate for me as to whether not no to paint over them. Some of my friends say to start fresh and paint it all. Others say it looks cool, so keep it. And other remind me that Native Americans are a huge part of US History. 

While I decide, I did so some general work on the remaining wall space. 


The earth tones were not chosen by me! The school provides the paint so that there is consistency throughout the school. As you can see, I taped off the Native American artwork. Of all the ones in the room, my administrator has said he would prefer I keep the large one pictured above. My plan for that one at least is to buy some crown molding, cut it to size and hang it like a frame. That way the face seems like a hanging painting instead of an actual painting on the wall.

What thoughts are there about the rest of the room? Paint over the tribal artwork or keep it? Side note: the reds and blues in the two sets of art work don't go together. As in different shades entirely...

Planning!

If you can't tell based on all my entries about my wedding, I am a bit of a planner. Organization was a coping mechanism that I developed during middle school and high school... it has served me well ever since. I have always had a planner and usually did the August-to-August Planner that you see at the bookstore. As a student and then as a coordinator it worked beautifully. By having the time spaces, I could schedule meetings and what not.

HOWEVER as teacher, I don't think I will be needing to schedule 10am meetings every other Thursday of the month. Additionally, I know my organization habits like having a place to keep notes and jot things down at a moments notice. Somehow, I would end up with my notebook and then my planner as two separate items that were rather full by the end of the year. Since this is my first year teaching with my own classroom, I thought I would find a new planner for myself...

Where to start? With other teachers! My teaching friends had all sorts of methods but none really suited mine until I remembered a high school friend of mine who just finished her first year teaching. She posted on her pages all the time about different teaching tactics she was trying, including OCD-like organization like mine! Thus, I stumbled across her new planner from Erin Condren and had one of those, "OH MY GOODNESS DO I NEED THIS PLANNER!!!" moments.

If you managed your way to Erin's site, you might have a bit of sticker shock over the price. Yes, $59.00 plus shipping is a bit steep. This was a hit to my bank account which is use to the normal $19.99 for the August-to-August planner and then my $7 spiral notebook. After watching the video though on what was included in the planner, I realized there price might be worth it.

So I ordered mine along with a pad of notepaper customized with my name, school and room number on them. I figured the notepaper might be good for when I send students to another classroom or to see a teacher and won't have to sign my name as much. After waiting about a week and half, my planner showed up on the front porch yesterday. Super excited to open it and see a planner suited for a teacher, not a student, and customized for me!
First off, its about 3/4" thick. Which is about the same at my old planner. Given that its 8.5x11 inch pages though gives it a distinct advantage in size!.
 Having served as a substitute this last year, this was an important and AWESOME page to see in here! The ruler (included in the back and serves as a bookmark) covers up information I wrote in about which teachers, administrators or secretaries to see in the building. You can bet by the end of September it will be filled with helpful information for them. I plan on making a copy to keep on my desk at school in case I get sick unexpectedly.


This area was one of the reasons I ultimately bought the planner - the year at a glance. It was big enough to write the information in about when things were happening for my two different class sections. As you can see, I am already putting that to use too. 


Again, another aspect I loved were the quotes and the stickers in the back of the planner. There are several pages of stickers about IEPs, assemblies, holidays, etc. and then sheets for me to make up my own. Also, throughout the planner are quotes about education, teaching, and helping students grow. Should be nice for little reminders about why I picked this career.

 I knew that the pocket fold (which is double sided) was in here along with a laminated calendar for the 2013-2014 school year. What I was forgot about when I ordered was the pocket full of gift tag labels that are included in planner. Should be nice for those days when I am running late to a social event after work and need to bring a gift with me!


 Yet another major reason this works better for me as a teacher, than as a student, is that I can keep track based on class areas and periods what is going on each day. This believe it or not is pretty dang helpful with my two different class levels. My three sections of students learning US History maybe in fact be at different places (which does happen) and the same with my two sections of students learning US History and Civics. There should be enough pages to get me through the school year... :)


These are the last two pages I really want to show off to you all. I love having quotes throughout the planner. The one on the left being right up front is one of the first teacher quotes I remember learning and really understanding on a deeper level. The picture on the right is the front of my notebook. But due to the personalization, I did want to keep some of that covered up.


Maybe you aren't a teacher though? Maybe you are an individual who is simply looking to organize their life? Erin has plenty of planners and options for that too. Additionally, there are some customization lunch boxes and gift type stuff on there. I am pretty creative but not creative enough to make some of the stuff she and her wonderful team do.

I will end my gushing about my awesome planner and let you go to work on it yourself. Happy planning bloggers and readers!

Tuesday, July 9, 2013

Post 4th Celebration


All of the how to's and, "where did she find that?" entry is just before this one. Here's the quick link though, Celebrating and decorating for the 4th of July

Well our 4th of July party was a hit! Our friends thought that out decorations both in the front and back of the house made it more than just a BBQ and actually felt like a holiday. :) They even thought the frames and the banner in the backyard made a great photo booth. Sadly, no one took me up on that offer.

Oh and my worry about the jello shots not being consumed? Not an issue. People actually liked having the sweetened milk jello on top because it made it such a sweet treat. Pretty sure two of my gal pals just ate those for dessert instead of the ice cream cake.

I wish I had gotten some pictures of the fireworks display in our neighborhood. Our friends thought out neighbors were insane for starting fireworks at 5pm but it was just a warm-up until about 9:30. By then, we moved to our front yard, got out the firepit, and set up shop. At around 9:30 our neighborhood went just NUTS. My close friend asked, "which way should we face to see the display?"

"WHICH EVER WAY YOU WANT.." because it truly was a going on all around us, and right in front of us too. We lit off about 80 artillery shells alone. People down the street probably went to the reservations and purchased theirs... the booms certainly reflected that. At one point, one of their fireworks set off a car alarm about six blocks down.

By the time our celebration wrapped up, our friends were asking already about next year. Looks like the new fireworks spot is our neighborhood.

Wednesday, July 3, 2013

Celebrating (and decorating) for the Fourth

It seems that my Pinterest feed has been exploding lately with Fourth of July celebration items. Get it? Explosion... fourth of july... alright it was a terrible joke. But I try inserting humor sometimes. Alirght, now to get back on topic. The Fourth of July. I'll touch on my pinterest stuff in a bit about what sparked my attention.

Mr. Husband is a big fan of fireworks, making dents in the pavement, and all things 'Merica. So he already has several traditions for himself and those have slowly become our traditions over the last several years. He's very much looking forward to going to the Indian Reservation tonight or tomorrow and purchasing some fireworks, which he hasn't done since he was a child. So, fireworks: check.

A little background on the food that we have on Independence Day, specifically dessert: The first summer we were dating, Mr. Husband and I spent in our college town. He was working for the University cleaning dorms, I was taking classes and working for my favorite non-profit organization. We, along with our friends the Webers (yes like the BBQ), celebrated the Fourth at Mr. Husband's rental house. Well, a few days before the fourth, Mr. Husband asked that we make ice cream cake to eat. He LOVES ice cream cake. I didn't have the skills, knowledge or time to make such a cake but I found a recipe on how to make ice cream PIE. So we went to the store and sought out the perfect Independence Day ice cream. Just so happens that Ben & Jerry had just released, "Stephen T. Colbert's Americone Dream" ice cream flavor. We love The Colbert Report when we do catch it so we purchased our two pints, a premade cookie crust and went to work. Americone Dream Ice Cream Pie was such a hit the first year that it has become part of annual celebration.

This year, we are hosting a BBQ for a small group of friends. Mostly co-workers of Mr. Husband's, one of close friends, and two of my high school buddies. So with that many people, knowing how the pie typically goes over, Mr. Husband had the ingenious idea to ask for TWO ice cream pies this year. Pretty sure he just wants one to himself though..

So here is what you need to make your own ice cream pie. Remember, I love to KISS (keep it simply silly) it and this is the epitamy of that.

Per Pie:
2 pints of ice cream (choose the flavor that suits your crowd)
1 premade cookie pie crust
Red, white and blue sprinkles.

THAT'S IT! Simply combine the two pints into a bowl. Mash them together until its smoothie like and then place in the pie crust.Top with sprinkles Put it in the freezer for about four hours or overnight. Serve with whipped topping if you choose. We usually let people put on their own amount of whipped topping on there so they can appease their own diets and/or appetites. Before serving we recommend the pie sit out at room temperature for about five to ten minutes so that people can actually eat it without freezing their tongue or spoon.

Here's a picture of one of our pies for this year:
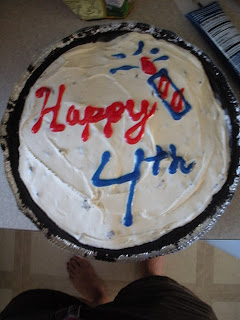
So sue me, I used sparkle writing gel instead of sprinkles! Make it your own!


Given that the group we are having over likes their adult beverages but occassionally enjoys a childhood twist, I decided this year to make patriotic jell-o shots after seeing them all over Pinterest. The trouble with most of the pinterest links for jell-o shots, as I discovered, is that most end up just at some sorority or fraternity page about a party they through instead of an actual recipe. So I ended up on google and found a few recipes. I tweaked it to my liking and definitely learned a thing or two.

I used Baker's Royale for the recipe I chose to use. I learned a few things last night by making them the way that I did. FIRST and foremost. I should have made only one set of each jell-o at a time, rather than all three at once as the author suggests. My jello set pretty dang fast and was almost set by the time I started putting them into the shot cups. Shot cups by the way, were pretty hard to find around here. Ultimately, I ended up purchasing (2) packs of 50 cups made by Diamond from our local Wallyworld (Wal-Mart) for about $4.80.
The second thing I learned was that Baker's Royale was using cupcake tins, not the shot cups like I was and that made a difference in measuring out the jell-o portions. Essentially because of the quick set instructions and proportions, my layers were a bit off and my jell-o shots don't look nearly as pretty as others. The rest of the instructions were pretty simply and straight forward, so I would use the recipe again.

So here's the look I was going for.... and here's what I actually got.


Can you see where I might have gone wrong? Just something to learn for next time I guess. :)

Decorations: Oh I love decorations! I especially loved the 12 blogs that came together to do the free printables seen here:
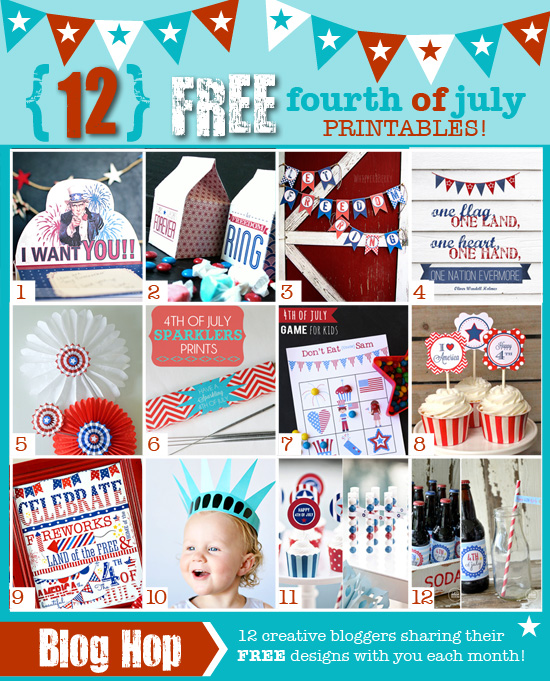
Chrissy - June Printable Club Grid

I snagged mine from The Dating Divas (direct link to the printables) and used the other bloggers linked there. Specifically, I went and printed out 3, 4, 5, 8 and 9. Here's my plan for the items:

3) Going up on our garage door. We are having our guests come through our side gate to our backyard, so I am trying to direct traffic that way. I also made sure to print it on card stock so I could use it again next year (build on tradition).

4 & 9) I printed and put them in white and blue frames I found on sale at our Fred Meyer's. I plan on putting thumb tacks in our wooden fence and hanging it them outside in our back yard.

5) I plan on making the rosettes and also putting up in our backyard. Maybe as guides to direct our small group of friends.

8) These are going in the jell-o shots as an extra piece of decoration. Simply print, put on a toothpick and wa-la!

Again, most of these I printed on plain card stock and plan on using again next year. Can you tell my paper cutter is going to be my best friend this afternoon?

One last printable I stole from Pinterest was the DIY banner The Dating Diva's sent out and posted online. Again, it will go up on our fence in the backyard and probably be a repeat decoration. As you can probably tell, I am a huge fan of the Dating Divas and get a lot of inspiration from their site sometimes.

I'll be posting pictures tomorrow as the decorations go up. Hope you all have a safe and happy fourth!

~*~
Finished products

Well, I couldn't wait until tomorrow to post pictures of the final products. Mind you this is not of my yard and the stuff in action but I just love sharing when crafting is complete. You know what I mean?

So here's a glimpse at the stuff I made today... while watching a marathon of The West Wing.


Again, I wish you all a safe and happy Independence Day celebration.