Mr. Husband is a big fan of fireworks, making dents in the pavement, and all things 'Merica. So he already has several traditions for himself and those have slowly become our traditions over the last several years. He's very much looking forward to going to the Indian Reservation tonight or tomorrow and purchasing some fireworks, which he hasn't done since he was a child. So, fireworks: check.
A little background on the food that we have on Independence Day, specifically dessert: The first summer we were dating, Mr. Husband and I spent in our college town. He was working for the University cleaning dorms, I was taking classes and working for my favorite non-profit organization. We, along with our friends the Webers (yes like the BBQ), celebrated the Fourth at Mr. Husband's rental house. Well, a few days before the fourth, Mr. Husband asked that we make ice cream cake to eat. He LOVES ice cream cake. I didn't have the skills, knowledge or time to make such a cake but I found a recipe on how to make ice cream PIE. So we went to the store and sought out the perfect Independence Day ice cream. Just so happens that Ben & Jerry had just released, "Stephen T. Colbert's Americone Dream" ice cream flavor. We love The Colbert Report when we do catch it so we purchased our two pints, a premade cookie crust and went to work. Americone Dream Ice Cream Pie was such a hit the first year that it has become part of annual celebration.
This year, we are hosting a BBQ for a small group of friends. Mostly co-workers of Mr. Husband's, one of close friends, and two of my high school buddies. So with that many people, knowing how the pie typically goes over, Mr. Husband had the ingenious idea to ask for TWO ice cream pies this year. Pretty sure he just wants one to himself though..
So here is what you need to make your own ice cream pie. Remember, I love to KISS (keep it simply silly) it and this is the epitamy of that.
Per Pie:
2 pints of ice cream (choose the flavor that suits your crowd)
1 premade cookie pie crust
Red, white and blue sprinkles.
THAT'S IT! Simply combine the two pints into a bowl. Mash them together until its smoothie like and then place in the pie crust.Top with sprinkles Put it in the freezer for about four hours or overnight. Serve with whipped topping if you choose. We usually let people put on their own amount of whipped topping on there so they can appease their own diets and/or appetites. Before serving we recommend the pie sit out at room temperature for about five to ten minutes so that people can actually eat it without freezing their tongue or spoon.
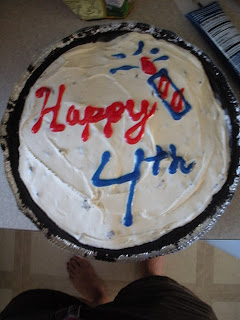
Here's a picture of one of our pies for this year:
 |
| So sue me, I used sparkle writing gel instead of sprinkles! Make it your own! |
Given that the group we are having over likes their adult beverages but occassionally enjoys a childhood twist, I decided this year to make patriotic jell-o shots after seeing them all over Pinterest. The trouble with most of the pinterest links for jell-o shots, as I discovered, is that most end up just at some sorority or fraternity page about a party they through instead of an actual recipe. So I ended up on google and found a few recipes. I tweaked it to my liking and definitely learned a thing or two.
I used Baker's Royale for the recipe I chose to use. I learned a few things last night by making them the way that I did. FIRST and foremost. I should have made only one set of each jell-o at a time, rather than all three at once as the author suggests. My jello set pretty dang fast and was almost set by the time I started putting them into the shot cups. Shot cups by the way, were pretty hard to find around here. Ultimately, I ended up purchasing (2) packs of 50 cups made by Diamond from our local Wallyworld (Wal-Mart) for about $4.80.
The second thing I learned was that Baker's Royale was using cupcake tins, not the shot cups like I was and that made a difference in measuring out the jell-o portions. Essentially because of the quick set instructions and proportions, my layers were a bit off and my jell-o shots don't look nearly as pretty as others. The rest of the instructions were pretty simply and straight forward, so I would use the recipe again.
So here's the look I was going for.... and here's what I actually got.
Can you see where I might have gone wrong? Just something to learn for next time I guess. :)
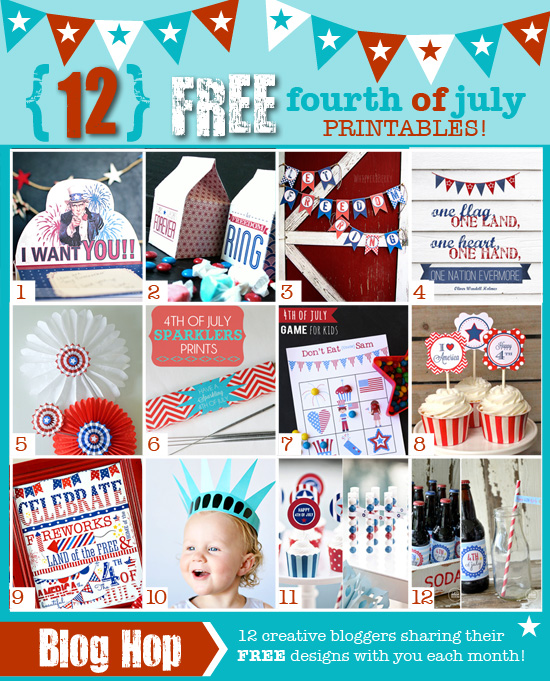
Decorations: Oh I love decorations! I especially loved the 12 blogs that came together to do the free printables seen here:

I snagged mine from The Dating Divas (direct link to the printables) and used the other bloggers linked there. Specifically, I went and printed out 3, 4, 5, 8 and 9. Here's my plan for the items:
3) Going up on our garage door. We are having our guests come through our side gate to our backyard, so I am trying to direct traffic that way. I also made sure to print it on card stock so I could use it again next year (build on tradition).
4 & 9) I printed and put them in white and blue frames I found on sale at our Fred Meyer's. I plan on putting thumb tacks in our wooden fence and hanging it them outside in our back yard.
5) I plan on making the rosettes and also putting up in our backyard. Maybe as guides to direct our small group of friends.
8) These are going in the jell-o shots as an extra piece of decoration. Simply print, put on a toothpick and wa-la!
Again, most of these I printed on plain card stock and plan on using again next year. Can you tell my paper cutter is going to be my best friend this afternoon?
One last printable I stole from Pinterest was the DIY banner The Dating Diva's sent out and posted online. Again, it will go up on our fence in the backyard and probably be a repeat decoration. As you can probably tell, I am a huge fan of the Dating Divas and get a lot of inspiration from their site sometimes.
I'll be posting pictures tomorrow as the decorations go up. Hope you all have a safe and happy fourth!
~*~
Finished products
Well, I couldn't wait until tomorrow to post pictures of the final products. Mind you this is not of my yard and the stuff in action but I just love sharing when crafting is complete. You know what I mean?
So here's a glimpse at the stuff I made today... while watching a marathon of The West Wing.
Again, I wish you all a safe and happy Independence Day celebration.


No comments:
Post a Comment